
UWM Axiomatic Project
Title: Heartbeat
Size: 40 cm by 23 cm
Medium: Cardboard
Date of Completion: January 2023
For my project titled ¨Heartbeat¨ I used cardboard as a medium to create a sculptural piece that was an enlarged replication of a stethoscope. I decided on a stethoscope as my object to replicate because I have a heart condition called SVT and a stethoscope was regularly used by my parents when I was a child to check if my heart was racing and determine if I was having an episode. I have always especially loved creating sculptures but using cardboard as a medium presented many challenges and made the process completely different from the clay sculptures I am used to.
Inspiration
Chris Glimour
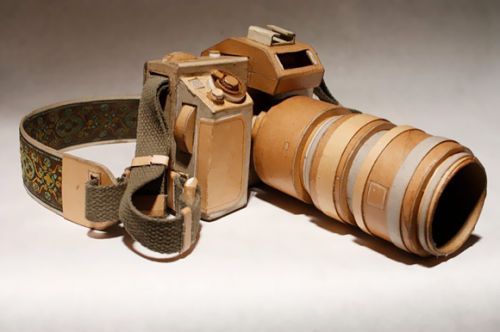
Chris Gilmour's camera sculpture is extremely precise and exhibits his attention to detail. The sculpture appears almost entirely identical to an actual camera. I wanted to embody this level of detail in my own piece and took inspiration from the crisp sharp edges that he was able to achieve. I determined based on this piece that it would be crucial for me to not have any glue or applicant visible from the outside. I appreciated Chris's use of different cardboards and materials to achieve the different colors that can be found in a real camera. It also breaks up the sculpture and makes it more visually appealing. Overall I think this piece has a very sophisticated and clean aesthetic and that was my main takeaway for inspiration in my
Chris Gilmour's camera sculpture is extremely precise and exhibits his attention to detail. The sculpture appears almost entirely identical to an actual camera. I wanted to embody this level of detail in my own piece and took inspiration from the crisp sharp edges that he was able to achieve. I determined based on this piece that it would be crucial for me to not have any glue or applicant visible from the outside. I appreciated Chris's use of different cardboards and materials to achieve the different colors that can be found in a real camera. It also breaks up the sculpture and makes it more visually appealing. Overall I think this piece has a very sophisticated and clean aesthetic and that was my main takeaway for inspiration in my
Cardboard Camera by Chris Glimour

Claes Oldenburg
Claes Oldenburg specializes in making sculptures of enlarged ordinary objects. He was inspired by the pop art movement and this is something that I found might be interesting to keep in mine for my piece. The pop art influence is evident in his works and effects the tone of the sculptures. Each sculpture is extremely clean and easy to identify which served as a huge inspiration for the way I went about making my piece. I wanted it to be immediately recognizable as a stethoscope. Each sculpture that Claes made feels familiar but also foreign as he would place them in outdoor settings where they stand out. I really liked specifically the stamp sculpture because its so simple and has very few lines and details but still resembles an actual stamp completely. I wanted my piece to be striking and have a stark and loud tone similar to Claes's pieces.
Shuttlecock by Claes Oldenburg

The Free Stamp by Claes Oldenburg
|

Giant Three Way Plug by CLaes Oldenburg
|
Planning

The first thing I did to start planning my sculpture was to study my object and begin sketching it to understand the look and dimensions. I looked at the stethoscope I had at home and found that it was actually much more complex then I had realized. The design had many curved elements and I realized certain aspects might be hard to replicate with cardboard. After creating multiple sketches I started to annotate my drawings and strategize how I would achieve the look I was going for with cardboard as my medium in mind. During this stage of my planning process I also began considering whether I wanted certain elements to be a different color. While this would accentuate them and make them pop I also wanted to make sure I was not distracting from the overall design. I did not want to take away too much from the medium. For this planing page I was much more focused on overall concept and layout rather than execution and fine details. I was also contemplating themes and how I wanted to describe the meaning behind my object.
Planning Page 1

For my second planning page I focused intently on each individual aspect of the stethoscope. I researched each component separately and drew them from multiple angles. This was probably the most helpful part of my planning process because I now understood how I would have to replicate the stethoscope in cardboard and I was able to identify how I wanted to make certain elements stand out more then others. While drawing the stethoscope I had at home I also found it useful to look online for references that showed the components separate from the rest of the stethoscope. Like for the earpieces they were much easier to draw based on blown up online photos. I made sure to only use references of the same stethoscope model that I owned. This planning page was made to help me with the execution process so that I was be clear on everything that needed to be made separately and so that I could start measuring all the different aspects I had sketched. On this page I further considered tone and mood and how I could present these through my sculpture.
Planning Page 2
Process

Using plate to measure chestpiece

Finished Chestpiece

Soaking Cardboard Strips

Finished Earpieces
|
Measurements
The first stage of my process was to begin measuring the stethoscope. This was important so that I could later determine how to make the proportionate dimensions of my cardboard replica. I had a hard time with this because since so many elements of my object were rounded and made up of tubes it was difficult to get the accurate measurements. I made sure to take my time and measure each element separately even measuring the different lengths of the different types of tubing that connected together. I then had to decide how much I wanted to increase these measurements for my sculpture which would be much larger then the actual stethoscope. I ultimately decided to times all my measurements by 4. I decided this by using the chestpiece measurements to make circles that would be 3x 4x and 5x and I was able to decide that the 4x looked the best and wasn't too large. I was a little concerned about whether or not I would be able to safely transport my final sculpture if it was too large cause I would then be risking it breaking. Circles When I started working with the cardboard the first thing I did was begin cutting out many circles. These circles were for the bell of the stethoscope and would later be stacked on top of one another to create height and create the cylindrical look I was going for. In order to get circles that were even and the correct measurements I found a plate in my house that was the right size compared to my original measurements and used this to create an outline by tracing it. There are two sides of a chest piece on a stethoscope called the diaphragm and the bell. The diaphragm is the piece that comes into contact with the skin. On my stethoscope this part had a slight lip and an inner ring that was lighter in color then the outside edge. I recreated this by starting with a base circle of cardboard and then cutting out a ring that was the same diameter as the original circle and glueing them together. Finally I delicately cut out the top later of cardboard on the original circle to expose the lighter inner color. Soaking Cardboard Originally I thought I would only have to soak a few larger sheets of cardboard for the tubing but I ended up finding that smaller strips worked much better and actually looked better too. So I had to measure and cut many strips of cardboard one but one and then separate them from the corrugation before soaking them. I soaked each piece for about 20 minutes before drying it slightly with paper towels and then wrapping it on my piece. Tubes To make the tube pieces I started by separating sheets of cardboard from the corrugation. Next cut the sheets into strips and began soaking them in water. I did this so that the cardboard would become limp and this way I could manipulate it much easier. Finally I used wood glue to glue down the strips in a spiral motion over the structure. Earpieces
The earpieces where pretty easy to make but the most time consuming part was cutting the holes on each side. Making the earpieces was very similar to the tubing of the rest of the stethoscope except this time I did not use wire for the foam structures because I needed them hollow and they did not have to bend at all. On the first one I forgot to cut the hole in the round piece of cardboard I used to cover the openings at the tip and bottom so I had to wait for the glue to dry completely and then carefully cut the holes with my exacto knife. This made it hard though because the holes were uneven and I was not able to exactly replicate the size for the other earpiece. However on the second one I used scissors to fold the circular pieces in half and cut a half circle to create the holes which was much better looking and easier. |
Experimentation
|
I used experimentation during my process to determine how I would replicate the tubing on the stethoscope. I knew I would need some cylindrical object to apply my cardboard to, however I was not sure initially how I would be able to create the curves in the tubing. I first considered the idea of using rope of some sort but after going to the craft store I realized they did not sell rope that was the diameter I needed none of it had the smooth surface I was looking for but rather had many ridges and dents. When looking around my home for alternatives I found some foam insulation tubes that were hallow in the center. I decided these would be perfect because they were flexible, had a smooth surface, but still held their shape when bent. The only issue I was was I was not sure how I would get the tubes to stay in the curved position I wanted them in. I thought about maybe putting rope inside them but I didn't know if the rope would be too heavy for the foam or if it would even hold its shape the way I wanted it to. Finally I thought about the idea of using some thick cord or wire because ideally I would be able to bend the wire in a way where it would be able to hold it shape. In my basement I was able to find an old sturdy extension cord that no longer worked. I used wire cutters to cut identical length pieces from the cord and inserted multiple of them into the piece of foam. The cords allowed the foam to keep the curved shape I wanted. |

Wire inside of foam insulation tubing
|
Critique

|

|

|
Similarities
My sculpture is similar in numerous ways to my inspiration sculptures. All three sculptures are a replication of an inanimate object. So each artist focused less on portraying a deeper symbolism but rather the emphasis was more so on the tone of the object and the importance of precise replication. My piece uses the same medium as Chris Gilmour and we both manipulated the medium to create different colorations that add definition to the different elements of our object. The camera also features prominent curved aspects that in a way resemble the curved elements of the tubing on my piece. Structurally I think there are some similarities in the emphasis created by the positioning of all the sculptures. Claes uses his environment to play a role in the tone of his piece however I think the way he relies on lighting impacts the importance of the bold lines in the 3D structure.
Differences
The main difference between my sculpture and my inspiration pieces is the overall tone. In my opinion my sculpture is slightly more organic looking and less clean compared to the other sculptures. I think this is because you can see the seams on the tubing and the corrugation is visible in multiple areas which is difference from Chris Gilmour´s camera piece where you can only see the smooth brown side of the cardboards with no visible glue on the seams. I also think there is a significant different between mine and Claes´s pieces because of the color element. Without color my piece definitely presents a different feeling and perhaps mine appears less realistic in general because of this. The setting of Claes´s piece also impacts the powerful jarring tone of him piece compared to mine which is not in any sort of environment.
Reflection
I learned a lot from the process of this piece but I faced some challenges along the way. Cardboard was a very difficult medium for me to work with. This is mainly because it was completely foreign to me but also because I felt that it did not complement the object I chose to replicate well. It was very hard for me to get any crip or clean edges due to the fact that almost all the edges are rounded. I think that this was important because it taught me a lot about experimentation. It also helped me with being able to come up with alternative solutions and thinking on the fly because a lot of my ideas for how to execute the piece ended up not working the way I planned. I have always really liked sculpting and I think I initially was thinking of this project like how I would with a clay sculpture but it was much different. I had to think a lot more technically and rather then taking away or subtracting like I do with sculpture I was building up cardboard piece by piece. A key change in my process that I had to make on the spot was my adhesive type. Originally I had planned to do my entire project using hot glue. However after reconsidering the tubes and spheres of my object I realized that a liquid glue would be much better in giving a clean look because the cardboard in these areas are very thin strips that would show hot glue texture too much. After trying out a regular white glue and finding it was not as strong as I liked I finally decided on wood glue. wood glue was very strong and relatively quick drying. It also dried completely clear and did not leave any bumps or distortion on the cardboard. The only technique that I could find to achieve the tubing was by soaking and wrapping cardboard strips around foam but this did not give me a seamless look so the end result was different from what I had originally imagined. One of the most difficult parts was making the earpieces because they were supposed to have a completely spherical component which was extremely hard to make from cardboard. In the end keeping the medium in mind I was actually very satisfied with the end result because it resembled my object very well and I felt it tells a story and presents my desired tone.
ACT Questions
1) Clearly explain how you are able to identify the cause effect relationship between your inspiration and its effect on your artwork?
My inspiration pieces served as an example to me as to how I wanted to execute the technical aspects of my sculpture such as the edges and sizing. They also inspired the tone I tried to present in my piece.
2) What is the overall approach the author has regarding the topic of your inspiration?
They felt as though environment and methods of execution greatly impact the overall tone of a sculpture of this nature. Precision is extremely influential in how your piece is perceived by the human eye regardless of the symbolism or object of inspiration.
3) What kind of generalizations and conclusions have you discovered about people, ideas, culture, etc. while you researched your inspiration?
I´ve discovered that a piece does not have to be abstract in any sense in order for it to be interpreted differently or display a strong tone. I think I previously felt that a thought provoking sculpture or art piece required some organic elements however through my research I found that this was not the case.
4) What is the central idea or theme around your inspirational research?
The central idea around my inspiration research is the importance of the construction process of a sculpture and how this can affect the end result greatly regarding tone and mood. As well as how scale can change the way an object is perceived by your audience.
5) What kind of inferences did you make while reading your research?
I am able to conclude that artists often take into account the location theu choose to have their sculpture in when creating a piece. For example Claes´s piece is much more striking and bold because it is in an area where you would not expect to see such an object especially of that scale.
Citations (MLA Format)
Blulab. “Chris Gilmour - Artists - Guidi4art.” Guidi, Marine Accessories, 3 Sept. 2018, https://www.guidisrl.it/en/chris-gilmour/.
“Chris Gilmour | Biography - Mutualart.com.” Chris Gilmour Selected Solo Exhibitions, https://www.mutualart.com/Artist/Chris-Gilmour/42EE9257E39C0DFB/Biography.
The Editors of Encyclopaedia Britannica. “Claes Oldenburg.” Encyclopædia Britannica, Encyclopædia Britannica, Inc., https://www.britannica.com/biography/Claes-Oldenburg.
